

12 Dog Yard Fence Ideas That Actually Keep My Dog Safe and Happy
As an Amazon affiliate, I earn a commission on qualifying purchases at no extra cost to you.
When I started planning my dog’s outdoor space, I realized that not every fence works for every dog.
Size, energy level, digging habits, and even weather all matter.
Below are 12 dog yard fence ideas I’ve personally researched, tested, or helped install, along with the materials and tools I rely on for each setup.
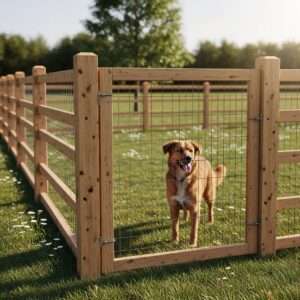
1. Wooden Privacy Fence
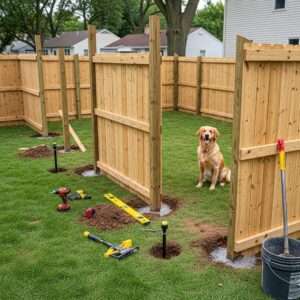
I chose a wooden privacy fence when I wanted maximum security and fewer distractions for my dog.
It also gave my yard a clean, finished look while keeping my dog fully contained.
Things I used:
Pressure-treated wood panels, wooden fence posts, galvanized nails or screws, post hole digger, concrete mix, level, power drill, exterior wood sealant
How I set it up:
First, I marked the fence line using stakes and string to keep everything straight.
I dug post holes about 2–3 feet deep, spaced evenly along the line.
After placing each post, I poured concrete into the holes and used a level to make sure the posts were perfectly straight before letting them cure for 24 hours.
Once the posts were secure, I attached the wooden panels using galvanized screws.
Finally, I applied an exterior wood sealant to protect the fence from weather and extend its lifespan.
2. Chain Link Fence
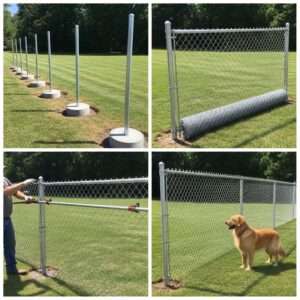
A chain link fence worked well for me because it’s affordable, durable, and easy to maintain. It allows my dog to see outside while still staying safely inside the yard.
Things I used:
Chain link mesh rolls, metal fence posts, post driver, tension bars, fence ties, pliers, concrete mix
How I set it up:
I started by driving the corner and end posts into the ground using a post driver.
After securing those posts with concrete, I installed the line posts at equal intervals.
I unrolled the chain link mesh along the fence line and attached it to the posts using tension bars and fence ties.
I made sure the mesh was pulled tight to prevent sagging, then trimmed any excess material for a clean finish.
3. Vinyl Fence

I installed a vinyl fence because I wanted something that looks modern and doesn’t require repainting or regular maintenance.
It’s also smooth, which helps prevent injuries.
Things I used:
Vinyl fence panels, vinyl posts, fast-setting concrete, rubber mallet, measuring tape, level
How I set it up:
I measured and marked the fence layout carefully before digging the post holes.
After placing the vinyl posts in the holes, I filled them with concrete and checked alignment using a level. Once the posts set,
I slid the vinyl panels into the routed post slots and tapped them gently with a rubber mallet to secure them.
The modular design made installation faster and cleaner.
Also check: 14 Dog yard fence gate ideas
4. Welded Wire Fence
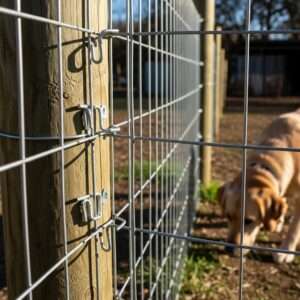
This option was perfect when I needed something affordable yet strong enough to keep my dog from squeezing through gaps.
Things I used:
Welded wire rolls, wooden or metal posts, heavy-duty staples, staple gun or hammer, fence stretcher
How I set it up:
I installed the posts first, spacing them about 6–8 feet apart.
Once they were secure, I unrolled the welded wire along the fence line and used a fence stretcher to pull it tight.
I attached the wire to each post using heavy-duty staples, making sure there were no loose sections at the bottom where my dog could push through.
5. Picket Fence
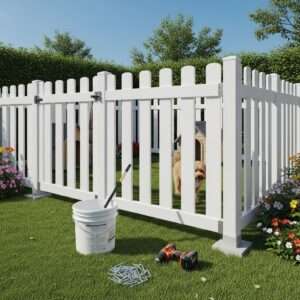
I went with a picket fence for a decorative look that still keeps my dog safely inside the yard.
Things I used:
Picket fence panels, fence posts, screws, power drill, concrete, exterior paint or sealant
How I set it up:
I began by setting the fence posts in concrete and letting them cure overnight.
After that, I attached the picket panels to the posts using screws, ensuring even spacing between each panel.
Once installed, I painted and sealed the fence to protect it from moisture and sun damage.
6. Electric Dog Fence
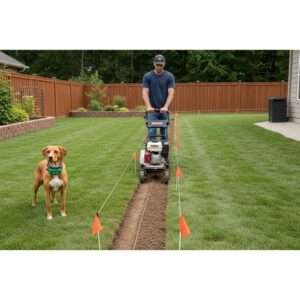
An electric dog fence helped me create boundaries where traditional fencing wasn’t practical.
Things I used:
Electric dog fence kit, boundary wire, training collar, wire flags, lawn edger, wire connectors
How I set it up:
I used a lawn edger to create a shallow trench around the boundary of my yard. I laid the wire into the trench and connected it to the transmitter.
After testing the system, I placed training flags along the boundary so my dog could visually learn the limits.
Training sessions over a few weeks helped my dog fully understand the boundary.
7. Bamboo Fence
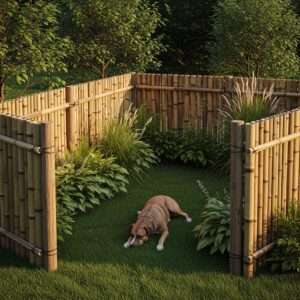
I chose bamboo fencing when I wanted an eco-friendly and natural-looking option for my garden area.
Things I used:
Bamboo fence rolls, wooden stakes, zip ties or wire, hammer, weatherproof sealant
How I set it up:
I installed wooden stakes firmly into the ground along the fence line.
Then I unrolled the bamboo fencing and attached it to the stakes using zip ties.
To increase durability, I applied a weatherproof sealant, which helped protect the bamboo from moisture and sun exposure.
Also check: 12 Dog fence small yard ideas
8. Metal Panel Fence
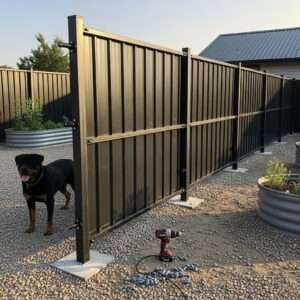
I installed a metal panel fence for strength and long-term durability.
This option works especially well for large or energetic dogs that might push against weaker fencing.
Things I used:
Metal fence panels, metal fence posts, mounting brackets, impact drill, bolts, concrete mix, level, measuring tape
How I set it up:
I started by measuring the yard perimeter and marking where each post would go.
I dug deep post holes and set the metal posts in concrete, making sure each one was level before the concrete dried.
Once the posts were solid, I mounted the metal panels using brackets and bolts, tightening everything securely with an impact drill.
I double-checked for sharp edges and ensured all panels were firmly attached so my dog couldn’t loosen them.
9. Pallet Fence (DIY Budget Option)
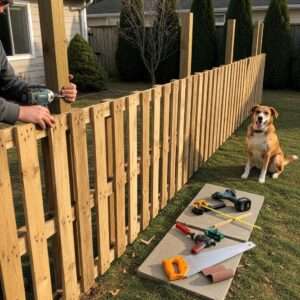
When I needed a low-cost solution, I built a pallet fence using reclaimed wood.
It took more effort, but it was very rewarding and surprisingly sturdy.
Things I used:
Wood pallets, crowbar, saw, power drill, exterior screws, sandpaper, wood stain or sealant
How I set it up:
First, I dismantled the pallets carefully using a crowbar and removed any nails.
I cut the boards to uniform sizes and sanded them down to prevent splinters.
Then I installed basic wooden posts along the fence line and screwed the pallet boards horizontally onto the posts.
To finish, I applied a weather-resistant stain to protect the wood and extend the fence’s lifespan.
10. Split Rail Fence with Wire Mesh
I love the rustic look of a split rail fence, but since dogs can easily slip through it, I added wire mesh for safety.
Things I used:
Split rail fence posts and rails, welded wire mesh, fence staples, staple gun or hammer, wire cutters
How I set it up:
I installed the split rail posts and rails first, following the manufacturer’s spacing instructions.
After that, I attached the welded wire mesh to the inside of the rails using fence staples.
I made sure the mesh reached all the way to the ground so my dog couldn’t squeeze underneath.
Once secured, I trimmed off excess wire for a clean and safe finish.
11. Fence with Concrete Footer (Anti-Dig Solution)

For dogs that love digging, this setup was a game changer.
Adding a concrete base completely stopped escape attempts.
Things I used:
Concrete mix, rebar or wire mesh, shovel, wheelbarrow, wooden forms, trowel, fence panels
How I set it up:
I dug a shallow trench along the fence line, about 8–12 inches deep.
I placed rebar inside the trench for reinforcement, then poured concrete evenly along the base.
Before it fully set, I installed the fence panels directly into the concrete footing.
Once cured, the concrete created a solid barrier that my dog couldn’t dig under.
12. Temporary Dog Play Fence

This option works great when I need flexibility, especially for puppies or temporary outdoor play areas.
Things I used:
Portable dog fence panels, ground stakes, mallet, zip ties
How I set it up:
I arranged the panels into the desired shape and secured them together using the built-in connectors or zip ties.
Then I drove the ground stakes into the soil with a mallet to keep everything stable.
The best part is that I can easily move or store the fence when it’s no longer needed.
From my experience, the key to any dog yard fence is proper installation, not just the materials.
Taking time to level posts, secure panels, and block digging spots makes all the difference in keeping my dog safe and stress-free.